by Timothy Martin, CEO and Editor-in-Chief read it |
| Send your url for review in the VirtuPortal! |
| Give us your email for regular news & updates about us |
 |
|
| Basic Game Programming in VRML by Steve Guynup Web 3D artist and guru, Steve Guynup lays out principles and techniques for building games in VRML. Steve shows details about how to use his game PROTOs to create fun, shoot-em up 3D applications for the web. |
|
|
Introduction
Shoot’em up type games use the collision between objects to creategame play. The gamer fires a projectile at a target object and upon collision with the target an event is generated. Unfortunately, VRML and most Web3D formats allow for collision and other forms of detection to occur only with the gamer’s avatar. Java is commonly used to fill this void.
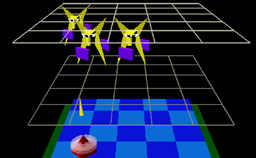
Contrary to popular belief, you can trick VRML to appear to have this object collision functionality. The concept is simple: the targets secretly fire back at you when you fire at them. Since you need to properly position or aim yourself at the targets, you fundamentally have the power to re-route that act of positioning so that a secret object does collide with you as your projectile collides with the target. This rule is applicable under wide range of circumstances. In the 3D Invaders game engine that follows, we have a grey cone, the users firebase. It uses a TouchSensor to follow the movement of the mouse and from it a yellow missile is fired on the touchTime. The target PROTO consists of a red box and a ProximitySensor is positioned higher and forward. Esstentially the sensor is positioned directly above the viewers position. So when the viewer fires up at the red box target, the sensor is fired down at the viewer. Both the red box and the sensor are animated with the same positionInterloper and they move unified manner. The key is that we route the same TouchSensor data that moves the grey cone to the PromixitySensor via a separate Transform node. This node has a rotational value of 0 1 0 3.14. This value inverts it and makes the incoming TouchSensor data move the PromixitySensor in reverse. In the beginning, the unmoving sensor was positioned above the viewer, this reverse action compensates for that change of position. When the grey cone is positioned under the red box, the PromixitySensor is positioned directly above the viewer. Firing activates both the yellow missile upwards animation and the PromixitySensor downwards animation.
About the Code The game code that follows is a single complete .wrl file. It has all the elements mentioned above. The code has been formatted to minimize its size, unneed spaces and Tabs have been removed. Printed, it runs about three pages. The reader may note seemingly the extra levels of Tranform nodes. These appear because the multiple animative forces are applied at different levels. An example of a slightly upgrading the game with sound, multiple targets and a game board is linked to at the end of this article. A third example with "proxy shapes" which show the position of the Avatar and ProximitySensor(s) is also linked at the end. The Proto Every VRML world begins with the following Header
The PROTO's first eventIn, set_fireTime, represents the act of firing the missile. (A TouchSensor is the trigger.) The proxyTranslation values are created by moving the firebase via the TouchSensor. This sensor appears later, in the Body Code.
The primary animation or behavior is routed to TARGET_ANIMATION01
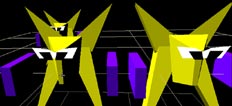
The object you shoot at is defined below as TARGET. Here it is a simple red box, but any conceiveable shape or form could be inlined into the file at this point. Note that the size of the box is one meter cubed, 1 1 1. The ProximitySensor (listed next) is also one meter cubed. A change in the object’s size means that the ProximitySensor size should change accordingly. Multiple sensors could be used to produce more complicated events. Also the animation triggered by a hit is routed here.
End of TARGET_ANIMATION01 This is the parent level of the ProximitySensor, TARGET_HITTER. The same animation that moves TARGET_ANIMATION01 also moves TARGET_HIT_ME_MOVER. In addition, the animation triggered by a hit is routed here.
The TARGET_INITIAL_POSITIONER uses the proxyTranslation values brought by the eventIn of the PROTO. The parent Transform has the rotation value of 0 1 0 3.14, and inverts the child TARGET_INITIAL_POSITIONER so that the motion is applied in reverse
When the firing mechanism is activated the animation which secretly moves the sensor down torward the viewer is routed to TARGET_HIT_ME
End of TARGET_HIT_ME_MOVER This first set of Clock and PositionInterpolater moves the ProximitySensor when the fire mechanism is activated. The fireTime eventIn is used.
Primary animation clock and path
Animation clock and path activated by TARGET being hit
Routes for all the PROTO’s animations and behaviors
This ends the PROTO target code.
The Body We start this section with NavigationInfo set to type NONE. The ProximitySensor is positioned relative to the Viewpoint below and if the user moves, the ProximitySensor will miss.
Use the PROTO. For multiple targets repeat the code using MY_TARGET02, MY_TARGET03 etc. Remember to add additional ROUTEs as well.
WEAPON_SHAPE is the form you weapon takes. At present, a grey cone is used. A child of this Transform is LASERBLAST_SHAPE. This is the missile that is fired upwards an appears to collide with the TARGET. Because it is a child, it is moved as the WEAPON_SHAPE is moved.
End of WEAPON_SHAPE
End of WEAPON_SHAPE
The information from the TOUCH TouchSensor is ROUTED to; WEAPON_SHAPE, LASERBLAST_SHAPE and the MY_TARGET01 PROTO. Further PROTOs will require additional ROUTES
End Game The code presented is only a beginning. More elements and functionality can be added without much difficulty. So enjoy, the code is free. To play some examples of the game above try:
Copyright © 2000 by Steve Guynup TSG ( That Steve Guy ). Edited by Jean Tam All rights reserved. |
| Current features * Core Web3D Book * Spazz3D: Authoring-tool * Game Programming in VRML Previous Features
|

VirtuWorlds, VirtuWorld, VirtuPortal, and 3DEZine are Trademarks of VIRTUWORLDS LLC.
No unauthorized uses are permitted.
© VirtuWorlds 1999, 2000


